AI for Web Devs: Prompt Engineering

I’m a web developer creating award-winning digital products for international nonprofits, growing startups, and government agencies. In my free time I write articles, contribute to open-source projects like Vuetensils and Particles CSS, live stream on YouTube and Twitch, host The Function Call podcast, and speak at events.
Welcome back to this series where we are building web applications that incorporate AI tooling. In the previous post, we covered what AI is, how it works, and some related terminology.
In this post, we’re going to cover prompt engineering, which is a way to modify your application’s behavior without changing the code. Since it’s challenging to explain without seeing the code, let’s get to it.
Start Adapting the UI
I hope you’ve come up with your own idea for an AI app, because this is where we’ll write mostly the same code, but could end up with different apps.
My app will take two different opponents and tell you who would win in a fight. I’ll start on the UI side of things because that’s easier for me.
So far, we’ve been giving users a single <textarea> and expecting them to write the entire prompt body to send to OpenAI. We can reduce the work users need to do and get more accurate prompts by modifying the UI to only ask for the missing details instead of the whole prompt.
In my app’s case, we really only need two things: opponent 1 and opponent 2. So instead of one input, we’ll have two.
This is a good opportunity to replace the <textarea> HTML with a reusable input component.
I’ll add a file called Input.jsx to the /src/components folder. The most basic example of a Qwik component is a function that uses the component$ function from "@builder.io/qwik" and returns JSX.
import { component$ } from "@builder.io/qwik";

export default component$((props) => {
  return (
    <div>
    </div>
  )
})
Our Input component should be reusable and accessible. For that, it needs a required label prop, a required name attribute, and an optional id which will default to a random string if not provided. And any other HTML attribute can be applied directly on the form control.
Here’s what I came up with along with JSDocs type definitions (note that the randomString function comes from this utility repo):
import { component$ } from "@builder.io/qwik";
import { randomString } from "~/utils.js";

/**
 * @typedef {import("@builder.io/qwik").HTMLAttributes<HTMLTextAreaElement>} TextareaAttributes
 */

/**
 * @type {import("@builder.io/qwik").Component<TextareaAttributes  & {
 * label: string,
 * name: string,
 * id?: string,
 * value?: string
 * }>}
 */
export default component$(({id, label, value, ...props}) => {
  const id = id || randomString(8)

  return (
    <div>
      <label for={id}>{label}</label>
      <textarea id={id} {...props}>{value}</textarea>
    </div>
  )
})
It’s rudimentary, but works for our app. If you’re feeling spunky, I encourage you to modify it to support the other input and select elements.
Now, instead of using a single <textarea> for the whole prompt, we can replace it with one of our new Input components for each opponent. I’ll put them in a two-column grid, so they sit next to each other on large screens.
<div class="grid gap-4 sm:grid-cols-2">
  <Input label="Opponent 1" name="opponent1" />
  <Input label="Opponent 2" name="opponent2" />
</div>
Side-Quest: global.d.ts
If you’re interested in using TypeScript or JSDocs, it may be useful to make the Qwik HTMLAttributes and Component global declarations so they’re easier to use across the application.
To do that, create a file at ./src/global.d.ts. Inside it, we’ll import HTMLAttributes and Component from "@builder.io/qwik" with aliases, then create global declarations with their original names that implement their functionality:
import type { Component as QC, HTMLAttributes as QH } from "@builder.io/qwik"

declare global {
  export type Component<T> = QC<T>
  export type HTMLAttributes<T> = QH<T>
}
This is just an optional step, but I like to do it because I use these two type definitions frequently. It’s nice to not have to import them all the time.
Adjust the Backend
Now that we’ve changed our UI to reduce the amount of information we ask for, we can move to the backend.
In the previous version, we were sending the entire prompt content using a form field named “prompt”. Now, we’re sending the two individual opponents, and we need to construct the prompt in the request handler.
export const onPost = async (requestEvent) => {
  // ...
  const formData = await requestEvent.parseBody()

  const { opponent1, opponent2 } = formData
  const prompt = `Who would win in a fight between ${opponent1} and ${opponent2}?`

  // ...
}
Functionally, this brings us back to where we were, except now there’s less work for the user to do and they have better guidance on what they need. That’s great! Unfortunately, the AI response is still something like, “As an AI language model I can’t predict hypothetical fights or determined definite winners blah blah blah…”
It’s not very helpful.
But because we’ve moved the control of the prompt to the backend, we’ve set the stage for prompt engineering because now we are in control of it instead of the user.
Here’s where our apps can take wildly different routes depending on how closely you want to follow the prompt that I write or if you make your own.
Begin Prompt Engineering
The AI already told us that there is no way it could know who could win in a fight, but what if we’re a little more persuasive? Let’s change our prompt to something like this:
const prompt = `Who would win in a fight between ${opponent1} and ${opponent2}?

Provide a creative and detailed explanation of why they would win and what tactics they might use.`
Now, instead of asking the AI for a wishy-washy answer, we’re encouraging it to provide a creative explanation. The result?
“In a hypothetical battle between a ninja and a pirate, the outcome would depend on several factors. Both ninjas and pirates possess unique skill sets and tactics that make them formidable opponents, so let’s imagine a thrilling encounter between the two and explore the possible outcome…”
That’s much better!
Of course, it’s going to be different each time, so I don’t expect you to get the same results, but the key thing is that the AI is cooperating.
Character Building
Our app is mostly working now, but I think we can also make it more interesting. One way to do that is to give the AI some context about the role it should play as it answers the questions. For example, why not make it answer questions as if it were a professional fighting judge from Liverpool who speaks mostly with Cockney slang?
To do that, we simply need to modify our prompt, but I also like to break up my prompt into various sections so it’s easier to manage.
const context = `You're a professional fighting judge from Liverpool that speaks mostly with Cockney slang`

const question = `Who would win in a fight between ${opponent1} and ${opponent2}?`

const format = `Provide a creative and detailed explanation of why they would win and what tactics they might use.`

const prompt = [context, question, format].join(' ')
This way, each separate section is captured by its own variable, which makes things easier for me to follow when I look at this later on.
What’s the result?
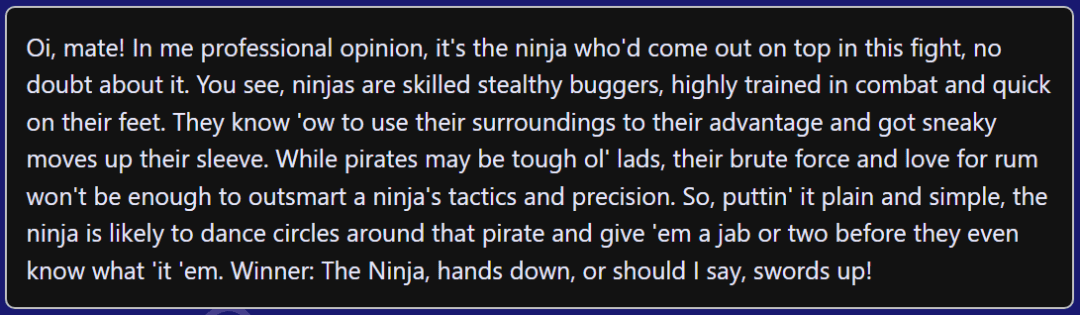
“Alright, mate! Let me put on me Cockney cap and dive into this lively debate between a ninja and a pirate. Picture meself in Liverpool, surrounded by kickin’ brick walls, ready to analyze this rumble in the most creative way…”
It spits out over three thousand words of ridiculousness, which is a lot of fun, but highlights another problem. The output is too long.
Understanding Tokens
Something worth understanding with these AI tools is “tokens”. From the OpenAI help article, “What are tokens and how to count them?“:
“Tokens can be thought of as pieces of words. Before the API processes the prompts, the input is broken down into tokens. These tokens are not cut up exactly where the words start or end – tokens can include trailing spaces and even sub-words.”
A token accounts for roughly four characters, they are calculated based on the text that the AI receives and produces, and there are two big reasons we need to be aware of them:
The platform charges based on the volume of tokens used.
Each LLM has a limit on the maximum tokens it can work with.
So it’s worth being cognizant of the length of text we send as a prompt as well as what we receive as a response. In some cases, you may want a lengthy response to achieve a better product, but otherwise, in other cases, it’s better to use fewer tokens.
In our case, a three thousand character response is not only a less-than-ideal user experience, it’s also costing us more money.
Reducing Tokens
Now that we’ve decided to reduce the tokens we use, the next question is, how?
If you’ve read through the OpenAI docs, you may have noticed a max_tokens parameter that we can set when we make the API request. Also, good on you for reading the docs. Five stars.
const body = {
  model: 'gpt-3.5-turbo',
  messages: [{ role: 'user', content: prompt }],
  stream: true,
  max_tokens: 100,
}

const response = await fetch('https://api.openai.com/v1/chat/completions', {
  method: 'post',
  headers: {
    'Content-Type': 'application/json',
    Authorization: `Bearer ${OPENAI_API_KEY}`,
  },
  body: JSON.stringify(body)
})
Let’s see what happens when we set the max_tokens parameter to something like 100.

Ok, now this is about the right length that I want, but it looks like it’s getting cut off. That’s because the GPT was given a hard limit on how much it could return, but it doesn’t account for that when constructing the response. As a result, we end up with an incomplete thought.
Not ideal.
Programmatically limiting the allowed length probably makes sense in some applications. It may even make sense in this one to add an upper bound. But to get a short AND complete response, the solution comes back to prompt engineering.
Let’s modify our prompt to ask for a “short explanation” instead of a “creative and detailed” one.
const format = `Only tell me who would win and a short reason why.`
Okay, this is more like what I had in mind. This is about the right length and level of detail. If you want to massage it some more, I encourage you to do so, but I’m going to move on.
Introducing LangChain
I want to address the clunkiness of the current system. You can imagine if we had a lot more prompts and a lot more endpoints it might be hard to manage. That’s why I want to introduce a tool chain called LangChain. In this new and constantly shifting world of AI, it’s been emerging as the leading tool chain for working with prompts. Let’s see why.
First, install the package with npm install @langchain/core.
The most relevant thing we can do with LangChain for our project is to generate prompts using prompt templates. Instead of generating our prompt from within our route handler, we can create a shareable prompt template and only provide the variables (opponent 1 & 2) at runtime. It’s essentially a factory function for prompts.
We can import the PromptTeplate module from "@langchain/core/prompts", then create a template and configure any variables it will consume like this:
const promptTemplate = new PromptTemplate({
  inputVariables: ['opponent1', 'opponent2'],
  template: `You're a professional fighting judge from Liverpool that speaks mostly with Cockney slang. Who would win in a fight between {opponent1} and {opponent2}? Only tell me who would win and a short reason why.`,
})
Notice that we’re using two inputVariables called “opponent1” and “opponent2”. These will be referenced in the template inside curly braces. It tells LangChain what variables to expect at runtime and where to place them.
So now, within our route handler, instead of constructing the entire prompt, we can call promptTemplate.format and provide our variables.
const prompt = await promptTemplate.format({
  opponent1: opponent1,
  opponent2: opponent2
})
Separating our prompt template from the route handler’s business logic simplifies the handler, makes the template easier to maintain, and allows us to export and share the template across the codebase if needed.
It’s worth mentioning that prompt templates are not the only benefit that LangChain offers. They also have tooling for managing the memory in chat applications, caching, handling timeouts, rate limiting, and more. This is just an introduction, but it’s worth getting more familiar with the capabilities if you plan on going deeper.
Identifying the Winner
One last thing that I want to do before we finish up today is to highlight the winner based on the response. Unfortunately, it’s hard to know that from a large block of indeterminate text.
Now, you may be thinking it would be nice to use a JSON object containing the winner and the text, and you’d be right.
Just one problem, in order to parse JSON, we need the entire JSON string, which means we would need to wait until the entire text completes. This kind of defeats the purpose of streaming.
This was one of the tricky challenges I found dealing with AI APIs.
The solution I came up with was to format the streaming response like so:
winner: opponent1 (or opponent2). reason: the reason they won...
This way, I could grab the winner programmatically and continue writing the reason to the page as it arrived by skipping the unrelated text. I’d love to hear your thoughts or see what you come up with, but let’s see how this worked.
First, we need to modify the prompt. In order for the AI to know how to respond with the winner, both opponents need a label (“opponent1” and “opponent2”). We’ll add those labels in parentheses when we first mention the opponents. And since we have a more specific requirement on what the returned format needs to be, we should also include that in the template.
Here’s what my template looks like now:
`You're a professional fighting judge from Liverpool that speaks mostly with Cockney slang. Who would win in a fight between {opponent1} ("opponent1") and {opponent2}("opponent2")? Only tell me who would win and a short reason why.

Format the response like this:
"winner: 'opponent1' or 'opponent2'. reason: the reason they won."`
Notice how now I’m giving the AI an example of what the response should look like. This is sometimes referred to as a one-shot prompt. What we had before without any example would be a zero-shot prompt. You can also have a multi-shot where you provide multiple examples.
OK, so now we should get back some text that tells us who the winner is and the reasoning.

The last step is to modify the way the frontend deals with this response so we separate the winner from the reasoning.
Showing just the reason to the user is the easy part. The first bit of the response will always be “winner: opponent1 (or 2). reason: “. So we can store the whole string in state, but skip the first 27 characters and show just the reason to the user. There are certainly some more advanced ways to get just the reasoning, but sometimes I prefer a simple solution.
We can replace this:
<p>{state.text}</p>
With this:
<p>{state.text.slice(27)}</p>
Identifying the winner is a little more robust. When the streaming response comes back, it still gets pushed to state.text. And after the response completes, we can pluck the winner from the results. You could slice the string, but I chose to use a Regular Expression:
// Previous fetch request logic

const winnerPattern = /winner:\s+(\w+).*/gi
const match = winnerPattern.exec(state.text)
const winner = match?.length ? match[1].toLowerCase() : ''
This Regular Expression looks for a string beginning with “winner:”, has an optional white-space character, then captures the next whole word up until a period character. Compared to our template, the captured word should either be “opponent1” or “opponent2”, our winners ;)
Once you have the winner, what you do with that information is up to you. I thought it would be cool to store it in state, and apply a fun rainbow background animation and confetti explosion (party-js) to the corresponding <textarea> .

That’s so fun. I love it!
I’ll let you sort that out if you want to recreate it, but here’s some of the code in case you’re interested.
JS:
if (state.winner) {
  const winnerInput = document.querySelector(`textarea[name=${state.winner}]`)
  if (winnerInput) {
    party.confetti(winnerInput, {
      count: 40,
      size: 2,
      spread: 15
    })
  }
}
CSS:
.rainbow {
  color: #fff;
  background: linear-gradient(45deg, #cc0000, #c8cc00, #38cc00, #00ccb5, #0015cc, #5f00cc, #c200cc, #cc0000);
  background-size: 1600% 1600%;
  animation: BgSlide 2s linear infinite;
}
@keyframes BgSlide {
  0% { background-position: 0% 50%; }
  100% { background-position: 100% 50%; }
}
Review
Alright, in the end, we did get into a few code changes, but I don’t want that to overshadow the main focus of this article. Now, we can drastically change the behavior of our app just by tweaking the prompt.
Some things we covered were:
Providing the AI with some context about its role.
Formatting responses.
The importance of understanding tokens.
Tooling like LangChain
Zero-shot, one-shot, and n-shot prompts.
I also don’t want to understate how much work can go into getting a prompt just right. This post was a silly example, but it actually took me a very long time to figure out the right permutations of words and formats to get what I needed. Don’t feel bad if it takes you a while to get used to it as well.
I truly believe that becoming a good prompt engineer will serve you well in the future. Even if you’re not building apps, it’s helpful for interacting with GPTs. But if you’re building apps, the key differentiating factors between the winners and losers will be the secret sauce that goes into the prompts and the form factor of using the app. It will need to be intuitive and provide the user with the least friction to get what they want.
In the next post we’ll start playing around with AI image generation, which comes with its own fun and quirky experience.
I hope you stick around, and feel free to reach out any time.
Thank you so much for reading. If you liked this article, and want to support me, the best ways to do so are to share it, sign up for my newsletter, and follow me on Twitter.
Originally published on austingil.com.