AI for Web Devs: Project Introduction & Setup

I’m a web developer creating award-winning digital products for international nonprofits, growing startups, and government agencies. In my free time I write articles, contribute to open-source projects like Vuetensils and Particles CSS, live stream on YouTube and Twitch, host The Function Call podcast, and speak at events.
If you’re anything like me, you’ve noticed the massive boom in AI technology. It promises to disrupt not just software engineering but every industry.
THEY’RE COMING FOR US!!!
Just kidding ;P
I’ve been bettering my understanding of what these tools are and how they work, and decided to create a tutorial series for web developers to learn how to incorporate AI technology into web apps.
In this series, we’ll learn how to integrate OpenAI‘s AI services into an application built with Qwik, a JavaScript framework focused on the concept of resumability (this will be relevant to understand later).
Here’s what the series outline looks like:
We’ll get into the specifics of OpenAI and Qwik where it makes sense, but I will mostly focus on general-purpose knowledge, tooling, and implementations that should apply to whatever framework or toolchain you are using. We’ll be working as closely to fundamentals as we can, and I’ll point out which parts are unique to this app.
Here’s a little sneak preview.

I thought it would be cool to build an app that takes two opponents and uses AI to determine who would win in a hypothetical fight. It provides some explanation and the option to create an AI-generated image. Sometimes the results come out a little wonky, but that’s what makes it fun.
I hope you’re excited to get started because in this first post we are mostly going to work on…
Boilerplate 😒
Prerequisites
Before we start building anything, we have to cover a couple of prerequisites. Qwik is a JavaScript framework, so we will have to have Node.js (and NPM) installed. You can download the most recent version, but anything above version v16.8 should work. I’ll be using version 20.
Next, we’ll also need an OpenAI account to have access to their API.
At the end of the series, we will deploy our applications to a VPS (Virtual Private Server). The steps we follow should be the same regardless of what provider you choose. I’ll be using Akamai’s cloud computing services (formerly Linode). New users can go to linode.com/austingil and get $100 in free credits to get started with Akamai.
Setting Up the Qwik App
Assuming we have the prerequisites out of the way, we can open a command line terminal and run the command: npm create qwik@latest. This will run the Qwik CLI that will help us bootstrap our application.
It will ask you a series of configuration questions, then generate the project for you. Here’s what my answers looked like:

If everything worked, open up the project and start exploring.
Inside the project folder, you’ll notice some important files and folders:
/src: contains all application business logic./src/components: contains reusable components to build our app with./src/routes: responsible for Qwik’s file-based routing. Each folder represents a route (can be a page or API endpoint). To make a page, drop aindex.{jsx|tsx}file in the route’s folder./src/root.tsx: this file exports the root component responsible for generating the HTML document root.
Start Development
Qwik uses Vite as a bundler, which is convenient because Vite has a built-in development server. It supports running our application locally, and updating the browser when files changes.
To start the development server, we can open our project in a terminal and execute the command npm run dev. With the dev server running, you can open the browser and head to http://localhost:5173 and you should see a very basic app.
Any time we make changes to our app, we should see those changes reflected almost immediately in the browser.
Add Styling
This project won’t focus too much on styling, so this section is totally optional if you want to do your own thing. To keep things simple, I’ll use Tailwind.
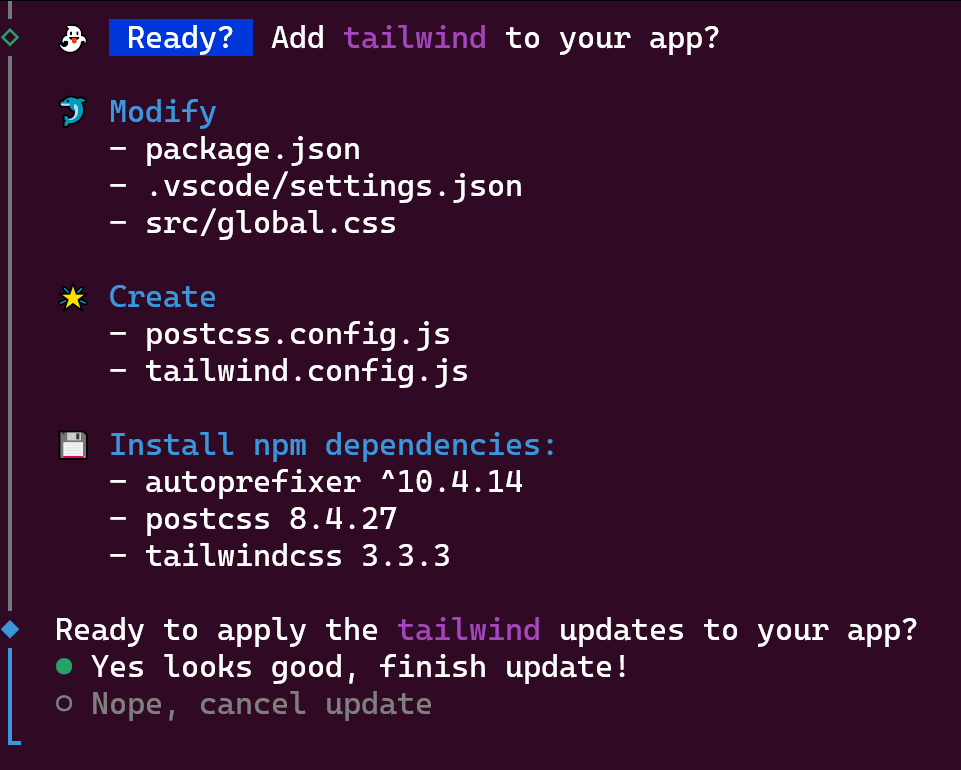
The Qwik CLI makes it easy to add the necessary changes, by executing the terminal command, npm run qwik add. This will prompt you with several available Qwik plugins to choose from.

You can use your arrow keys to move down to the Tailwind plugin and press Enter. Then it will show you the changes it will make to your codebase and ask for confirmation. As long as it looks good, you can hit Enter, once again.
For my projects, I also like to have a consistent theme, so I keep a file in my GitHub to copy and paste styles from. Obviously, if you want your own theme, you can ignore this step, but if you want your project to look as amazing as mine, copy the styles from this file on GitHub into the /src/global.css file. You can replace the old styles, but leave the Tailwind directives in place.
Prepare Homepage
The last thing we’ll do today to get the project in a good starting point is make some changes to the homepage. This means making changes to /src/routes/index.tsx.
By default, this file starts out with some very basic text, and an example for modifying the HTML <head> by exporting a head variable. The changes I want to make include:
Removing the
headexport.Removing all text except the
<h1>. Feel free to add your own page title text.Adding some Tailwind classes to center the content and make the
<h1>larger.Wrapping the content with a
<main>tag to make it more semantic.Adding Tailwind classes to the
<main>tag to add some padding and center the contents.
These are all minor changes that aren’t strictly necessary, but I think it will provide a nice starting point for building out our app in the next post.
Here’s what the file looks like after my changes.
import { component$ } from "@builder.io/qwik";

export default component$(() => {
  return (
    <main class="max-w-4xl mx-auto p-4">
      <h1 class="text-6xl">Hi 👋</h1>
    </main>
  );
});
And in the browser, it looks like this:

Conclusion
That’s all we’ll cover today. Again, this post was mostly focused on getting the boilerplate stuff out of the way so that the next post can be dedicated to integrating OpenAI’s API into our project.
With that in mind, I encourage you to take a moment to think about some AI app ideas that you might want to build. There will be a lot of flexibility for you to put your own spin on things.
I’m excited to see what you come up with, and if you would like to explore the code in more detail, I’ll post it on my GitHub account at github.com/austingil/versus.
Thank you so much for reading. If you liked this article, and want to support me, the best ways to do so are to share it, sign up for my newsletter, and follow me on Twitter.
Originally published on austingil.com.