AI for Web Devs: Faster Responses with HTTP Streaming

I’m a web developer creating award-winning digital products for international nonprofits, growing startups, and government agencies. In my free time I write articles, contribute to open-source projects like Vuetensils and Particles CSS, live stream on YouTube and Twitch, host The Function Call podcast, and speak at events.
Welcome back to this series where we’re building web applications with AI tooling.
In the previous post, we got AI generated jokes into our Qwik application from OpenAI API. It worked, but the user experience suffered because we had to wait until the API completed the entire response before updating the client.
A better experience, as you’ll know if you’ve used any AI chat tools, is to respond as soon as each bit of text is generated. It becomes a sort of teletype effect.
That’s what we’re going to build today using HTTP streams.
Prerequisites
Before we get into streams, we need to explore something with a Qwik quirk related to HTTP requests.
If we examine the current POST request being sent by the form, we can see that the returned payload isn’t just the plain text we returned from our action handler. Instead, it’s this sort of serialized data.
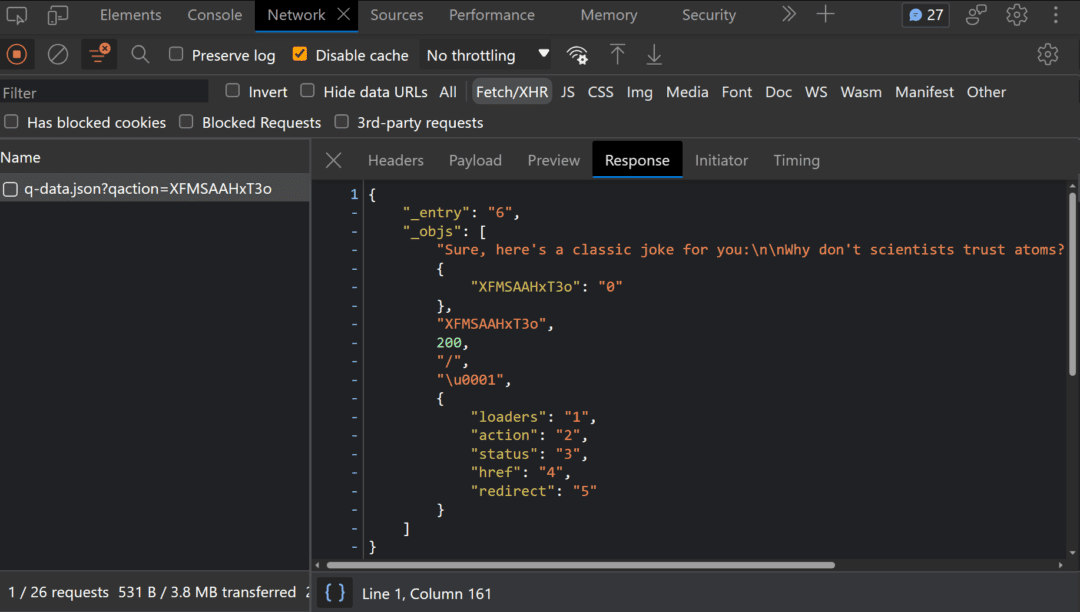
This is the result of how the Qwik Optimizer lazy loads assets and is necessary to properly handle the data as it comes back. Unfortunately, this prevents standard streaming responses.
So while routeAction$ and the Form component are super handy, we’ll have to do something else.
To their credit, the Qwik team does provide a well-documented approach for streaming responses. However, it involves their server$ function and async generator functions. This would probably be the right approach if we’re talking strictly about Qwik, but this series is for everyone. I’ll avoid this implementation, as it’s too specific to Qwik, and focus on broadly applicable concepts instead.
Refactor Server Logic
It sucks that we can’t use route actions because they’re great. So what can we use?
Qwik City offers a few options. The best I found is middleware. They provide enough access to primitive tools that we can accomplish what we need, and the concepts will apply to other contexts besides Qwik.
Middleware is essentially a set of functions that we can inject at various points within the request lifecycle of our route handler. We can define them by exporting named constants for the hooks we want to target (onRequest, onGet, onPost, onPut, onDelete).
So instead of relying on a route action, we can use a middleware that hooks into any POST request by exporting an onPost middleware. In order to support streaming, we’ll want to return a standard Response object. We can do so by creating a Response object and passing it to the requestEvent.send() method.
Here’s a basic (non-streaming) example:
/** @type {import('@builder.io/qwik-city').RequestHandler} */
export const onPost = (requestEvent) => {
  requestEvent.send(new Response('Hello Squirrel!'))
}
Before we tackle streaming, let’s get the same functionality from the old route action implemented with middleware. We can copy most of the code into the onPost middleware, but we won’t have access to formData.
Fortunately, we can recreate that data from the requestEvent.parseBody() method. We’ll also want to use requestEvent.send() to respond with the OpenAI data instead of a return statement.
/** @type {import('@builder.io/qwik-city').RequestHandler} */
export const onPost = async (requestEvent) => {
  const OPENAI_API_KEY = requestEvent.env.get('OPENAI_API_KEY')
  const formData = await requestEvent.parseBody()

  const prompt = formData.prompt
  const body = {
    model: 'gpt-3.5-turbo',
    messages: [{ role: 'user', content: prompt }]
  }

  const response = await fetch('https://api.openai.com/v1/chat/completions', {
    // ... fetch options
  })
  const data = await response.json()

  const responseBody = data.choices[0].message.content

  requestEvent.send(new Response(responseBody))
}
Refactor Client Logic
Replacing the route actions has the unfortunate side effect of meaning we also can’t use the <Form> component anymore. We’ll have to use a regular HTML <form> element and recreate all the benefits we had before, including sending HTTP request with JavaScript, tracking the loading state, and accessing the results. Let’s refactor our client-side to support those features again.
We can break these requirements down to needing two things, a JavaScript solution for submitting forms and a reactive state for managing loading states and results.
I’ve covered submitting HTML forms with JavaScript in depth several times in the past:
So today I’ll just share the snippet, which I put inside a utils.js file in the root of my project. This jsFormSubmit function accepts an HTMLFormElement then constructs a fetch request based on the form attributes and returns the resulting Promise:
/**
 * @param {HTMLFormElement} form
 */
export function jsFormSubmit(form) {
  const url = new URL(form.action)
  const formData = new FormData(form)
  const searchParameters = new URLSearchParams(formData)

  /** @type {Parameters<typeof fetch>[1]} */
  const fetchOptions = {
    method: form.method
  }

  if (form.method.toLowerCase() === 'post') {
    fetchOptions.body = form.enctype === 'multipart/form-data' ? formData : searchParameters
  } else {
    url.search = searchParameters
  }

  return fetch(url, fetchOptions)
}
This generic function can be used to submit any HTML form, so it’s handy to use in a submit event handler. Sweet!
As for the reactive data, Qwik provides two options, useStore and useSignal. I prefer useStore, which allows us to create an object whose properties are reactive. Meaning changes to the object’s properties will automatically be reflected wherever they are referenced in the UI.
We can use useStore to create a “state” object in our component to track the loading state of the HTTP request as well as the text response.
import { $, component$, useStore } from "@builder.io/qwik";
// other setup logic

export default component$(() => {
  const state = useStore({
    isLoading: false,
    text: '',
  })

  // other component logic
})
Next, we can update the template. Since we can no longer use the action object we had before, we can replace references from action.isRunning and action.value to state.isLoading and state.text, respectively (don’t ask me why I changed the property names 🤷♂️). I’ll also add a “submit” event handler to the form called handleSbumit, which we’ll look at shortly.
<main>
  <form
    method="post"
    preventdefault:submit
    onSubmit$={handleSubmit}
  >
    <div>
      <label for="prompt">Prompt</label>
      <textarea name="prompt" id="prompt">
        Tell me a joke
      </textarea>
    </div>

    <button type="submit" aria-disabled={state.isLoading}>
      {state.isLoading ? 'One sec...' : 'Tell me'}
    </button>
  </form>

  {state.text && (
    <article>
      <p>{state.text}</p>
    </article>
  )}
</main>
Note that the <form> does not explicitly provide an action attribute. By default, an HTML form will submit data to the current URL, so we only need to set the method to POST and submit this form to trigger the onPost middleware we defined earlier.
Now, the last step to get this refactor working is defining handleSubmit. Just like we did in the previous post, we need to wrap an event handler inside Qwik’s $ function.
Inside the event handler, we’ll want to clear out any previous data from state.text, set state.isLoading to true, then pass the form’s DOM node to our fancy jsFormSubmit function. This should submit the HTTP request for us. Once it comes back, we can update state.text with the response body, and return state.isLoading to false.
const handleSubmit = $(async (event) => {
  state.text = ''
  state.isLoading = true

  /** @type {HTMLFormElement} */
  const form = event.target

  const response = await jsFormSubmit(form)

  state.text = await response.text()
  state.isLoading = false
})
OK! We should now have a client-side form that uses JavaScript to submit an HTTP request to the server while tracking the loading and response states, and updating the UI accordingly.
That was a lot of work to get the same solution we had before but with fewer features. BUT the key benefit is we now have direct access to the platform primitives we need to support streaming.
Enable Streaming on the Server
Before we start streaming responses from OpenAI, I think it’s helpful to start with a very basic example to get a better grasp of streams. Streams allow us to send small chunks of data over time. So as an example, let’s print out some iconic David Bowie lyrics in tempo with the song, “Space Oddity“.
When we construct our Response object, instead of passing plain text, we’ll want to pass a stream. We’ll create the stream shortly, but here’s the idea:
/** @type {import('@builder.io/qwik-city').RequestHandler} */
export const onPost = (requestEvent) => {
  requestEvent.send(new Response(stream))
}
We’ll create a very rudimentary ReadableStream using the ReadableStream constructor and pass it an optional parameter. This optional parameter can be an object with a start method that’s called when the stream is constructed.
The start method is responsible for the steam’s logic and has access to the stream controller, which is used to send data and close the stream.
const stream = new ReadableStream({
  start(controller) {
    // Stream logic goes here
  }
})
OK, let’s plan out that logic. We’ll have an array of song lyrics and a function to ‘sing’ them (pass them to the stream). The sing function will take the first item in the array and pass that to the stream using the controller.enqueue() method. If it’s the last lyric in the list, we can close the stream with controller.close(). Otherwise, the sing method can call itself again after a short pause.
const stream = new ReadableStream({
  start(controller) {
    const lyrics = ['Ground', ' control', ' to major', ' Tom.']
    function sing() {
      const lyric = lyrics.shift()

      controller.enqueue(lyric)

      if (lyrics.length < 1) {
        controller.close()
      } else {
        setTimeout(sing, 1000)
      }
    }
    sing()
  }
})
So each second, for four seconds, this stream will send out the lyrics “Ground control to major Tom.” Slick!
Because this stream will be used in the body of the Response, the connection will remain open for four seconds until the response completes. But the frontend will have access to each chunk of data as it arrives, rather than waiting the full four seconds.
This doesn’t speed up the total response time (in some cases, streams can increase response times), but it does allow for a faster perceived response, and that makes a better user experience.
Here’s what my code looks like:
/** @type {import('@builder.io/qwik-city').RequestHandler} */
export const onPost: RequestHandler = async (requestEvent) => {
  const stream = new ReadableStream({
    start(controller) {
      const lyrics = ['Ground', ' control', ' to major', ' Tom.']
      function sing() {
        const lyric = lyrics.shift()

        controller.enqueue(lyric)

        if (lyrics.length < 1) {
          controller.close()
        } else {
          setTimeout(sing, 1000)
        }
      }
      sing()
    }
  })

  requestEvent.send(new Response(stream))
}
Unfortunately, as it stands right now, the client will still be waiting four seconds before seeing the entire response, and that’s because we weren’t expecting a streamed response.
Let’s fix that.
Enable Streaming on the Client
Even when dealing with streams, the default browser behavior when receiving a response is to wait for it to complete. In order to get the behavior we want, we’ll need to use client-side JavaScript to make the request and process the streaming body of the response.
We’ve already tackled that first part inside our handleSubmit function. Let’s start processing that response body.
We can access the ReadableStream from the response body’s getReader() method. This stream will have its own read() method that we can use to access the next chunk of data, as well as the information if the response is done streaming or not.
The only ‘gotcha’ is that the data in each chunk doesn’t come in as text, it comes in as a Uint8Array, which is “an array of 8-bit unsigned integers.” It’s basically the representation of the binary data, and you don’t really need to understand any deeper than that unless you want to sound very smart at a party (or boring).
The important thing to understand is that on their own, these data chunks aren’t very useful. To get something we can use, we’ll need to decode each chunk of data using a TextDecoder.
Ok, that’s a lot of theory. Let’s break down the logic and then look at some code.
When we get the response back, we need to:
Grab the reader from the response body using
response.body.getReader()Setup a decoder using
TextDecoderand a variable to track the streaming status.Process each chunk until the stream is complete, with a
whileloop that does this:Grab the next chunk’s data and stream status.
Decode the data and use it to update our app’s
state.text.Update the streaming status variable, terminating the loop when complete.
Update the loading state of the app by setting
state.isLoadingtofalse.
The new handleSubmit function should look something like this:
const handleSubmit = $(async (event) => {
  state.text = ''
  state.isLoading = true

  /** @type {HTMLFormElement} */
  const form = event.target

  const response = await jsFormSubmit(form)

  // Parse streaming body
  const reader = response.body.getReader()
  const decoder = new TextDecoder()
  let isStillStreaming = true

  while(isStillStreaming) {
    const {value, done} = await reader.read()
    const chunkValue = decoder.decode(value)

    state.text += chunkValue

    isStillStreaming = !done
  }

  state.isLoading = false
})
Now, when I submit the form, I see something like:
“Ground
control
to major
Tom.”
Hell yeah!!!
OK, most of the work is down. Now we just need to replace our demo stream with the OpenAI response.
Stream OpenAI Response
Looking back at our original implementation, the first thing we need to do is modify the request to OpenAI to let them know that we would like a streaming response. We can do that by setting the stream property in the fetch payload to true.
const body = {
  model: 'gpt-3.5-turbo',
  messages: [{ role: 'user', content: prompt }],
  stream: true
}

const response = await fetch('https://api.openai.com/v1/chat/completions', {
  method: 'post',
  headers: {
    'Content-Type': 'application/json',
    Authorization: `Bearer ${OPENAI_API_KEY}`,
  },
  body: JSON.stringify(body)
})
UPDATE 2023/11/15: I used fetch and custom streams because at the time of writing, the openai module on NPM did not properly support streaming responses. That issue has been fixed, and I think a better solution would be to use that module and pipe their data through a TransformStream to send to the client. That version is not reflected here.
Next, we could pipe the response from OpenAI directly to the client, but we might not want to do that. The data they send doesn’t really align with that we want to send to the client because it looks like this (two chunks, one with data, and one representing the end of the stream):
data: {"id":"chatcmpl-4bJZRnslkje3289REHFEH9ej2","object":"chat.completion.chunk","created":1690319476,"model":"gpt-3.5-turbo-0613","choiced":[{"index":0,"delta":{"content":"Because"},"finish_reason":"stop"}]}
data: [DONE]
Instead, what we’ll do is create our own stream, similar to the David Bowie lyrics, that will do some setup, enqueue chunks of data into the stream, and close the stream. Let’s start with an outline:
const stream = new ReadableStream({
  async start(controller) {
    // Any setup before streaming
    // Send chunks of data
    // Close stream
  }
})
Since we’re dealing with a streaming fetch response from OpenAI, a lot of the work we need to do here can actually be copied from the client-side stream handling. This part should look familiar:
const reader = response.body.getReader()
const decoder = new TextDecoder()
let isStillStreaming = true

while(isStillStreaming) {
  const {value, done} = await reader.read()
  const chunkValue = decoder.decode(value)

  // Here's where things will be different

  isStillStreaming = !done
}
This snippet was taken almost directly from the frontend stream processing example. The only difference is that we need to treat the data coming from OpenAI slightly differently. As we say, the chunks of data they send up will look something like”data: [JSON data or done]“. Another gotcha is that every once in a while, they’ll actually slip in TWO of these data strings in a single streaming chunk. So here’s what I came up with for processing the data.
Create a Regular Expression to grab the rest of the string after “
data:“.For the unlikely event there are more than one data strings, use a while loop to process every match in the string.
If the current matches the closing condition (“
[DONE]“) close the stream.Otherwise, parse the data as JSON and enqueue the first piece of text from the list of options (
json.choices[0].delta.content). Fall back to an empty string if none is present.Lastly, in order to move to the next match, if there is one, we can use
RegExp.exec().
The logic is quite abstract without looking at code, so here’s what the whole stream looks like now:
const stream = new ReadableStream({
  async start(controller) {
    // Do work before streaming
    const reader = response.body.getReader()
    const decoder = new TextDecoder()
    let isStillStreaming = true

    while(isStillStreaming) {
      const {value, done} = await reader.read()
      const chunkValue = decoder.decode(value)

      /**
       * Captures any string after the text `data: `
       * @see https://regex101.com/r/R4QgmZ/1
       */
      const regex = /data:\s*(.*)/g
      let match = regex.exec(chunkValue)

      while (match !== null) {
        const payload = match[1]

        // Close stream
        if (payload === '[DONE]') {
          controller.close()
          break
        } else {
          try {
            const json = JSON.parse(payload)
            const text = json.choices[0].delta.content || ''

            // Send chunk of data
            controller.enqueue(text)
            match = regex.exec(chunkValue)
          } catch (error) {
            const nextChunk = await reader.read()
            const nextChunkValue = decoder.decode(nextChunk.value)
            match = regex.exec(chunkValue + nextChunkValue)
          }
        }
      }

      isStillStreaming = !done
    }
  }
})
UPDATE 2023/11/15: I discovered that OpenAI API sometimes returns the JSON payload across two streams. So the solution is to use a try/catch block around the JSON.parse and in the case that it fails, reassign the match variable to the current chunk value plus the next chunk value. The code above has the updated snippet.
Review
That should be everything we need to get streaming working. Hopefully it all makes sense and you got it working on your end.
I think it’s a good idea to review the flow to make sure we’ve got it:
The user submits the form, which gets intercepted and sent with JavaScript. This is necessary to process the stream when it returns.
The request is received by the action handler which forwards the data to the OpenAI API along with the setting to return the response as a stream.
The OpenAI response will be sent back as a stream of chunks, some of which contain JSON and the last one being “
[DONE]“.Instead of passing the stream to the action response, we create a new stream to use in the response.
Inside this stream, we process each chunk of data from the OpenAI response and convert it to something more useful before enqueuing it for the action response stream.
When the OpenAI stream closes, we also close our action stream.
The JavaScript handler on the client side will also process each chunk of data as it comes in and update the UI accordingly.
Conclusion
The app is working. It’s pretty cool. We covered a lot of interesting things today. Streams are very powerful, but also challenging and, especially when working within Qwik, there are a couple of little gotchas. But because we focused on low-level fundamentals, these concepts should apply across any framework.
As long as you have access to the platform and primitives like streams, requests, and response objects then this should work. That’s the beauty of fundamentals.
I think we got a pretty decent application going now. The only problem is right now we’re using a generic text input and asking users to fill in the entire prompt themselves. In fact, they can put in whatever they want. We’ll want to fix that in a future post, but the next post is going to step away from code and focus on understanding how the AI tools actually work.
I hope you’ve been enjoying this series and come back for the rest of it.
Thank you so much for reading. If you liked this article, and want to support me, the best ways to do so are to share it, sign up for my newsletter, and follow me on Twitter.
Originally published on austingil.com.